How to Reduce the Reverb on a Track
The key to making your mixes sound modern and professional is depth.
A good mix is more than just a good recording. It has a sense of space, a 'larger-than-life' quality…
In essence, a good mix sounds 3D.
So, how do you achieve that?
It all comes down to your use of reverb and delay.
In this ultimate guide, you're going to learn how to use reverb like a pro by applying 3 simple techniques…
…and I'll share 8 quick tips for mixing with reverb that will make your music sound more professional in seconds.
Plus, you'll also learn the key difference between reverb and delay, and when to use which.
Contents
- Do you want to make money from your music?
- How to Use Reverb – The Only 3 Techniques You Need
- How to Create Depth
- Creating Cohesion
- Adding Interest
- Mixing with Reverb Is Easy-Peasy with These 8 Quick Tips
- Tip 1: Short Decay Times
- Tip 2: Use One Plugin
- Tip 3: Use a Buss
- Tip 4: Use Less
- Tip 5: Use Delays
- Tip 6: Use Subtle Reverb On Your Delay Sends
- Tip 7: Use Pre-Delays
- Tip 8: Experiment with EQ
- Reverb vs Delay – How to Make Your Mixes 3D
- Reverb and Delay – The Key Difference
- Strategy One – Using Reverb
- Strategy Two – Using Delay
- Strategy Three – Mix It Up
- Do you want to make money from your music?
Do you want to make money from your music?
You don't need expensive gear, connections, or god-like knowledge to kickstart your career.
This free Masterclass reveals the key steps you ACTUALLY need to make a reliable income doing what you love in 2021.
Catch the full Masterclass here:
But if you just want to learn about Reverb specifically, keep reading.
How to Use Reverb – The Only 3 Techniques You Need
The key to making your mixes sound modern and professional is depth. A good mix is more than just a good recording. It has a sense of space, a 'larger-than-life' quality... In essence, a good mix sounds 3D. So, how do you achieve that? It all comes down to your use of reverb and delay. In this ultim
How to Create Depth
One of the main reasons you must learn how to use reverb is to create DEPTH in your mixes. You do this by applying more reverberation on some instruments than others.
When a sound or melody line has more reverb, it sounds FURTHER away from the listener. When a sound has less it sounds CLOSER.
Creating Cohesion
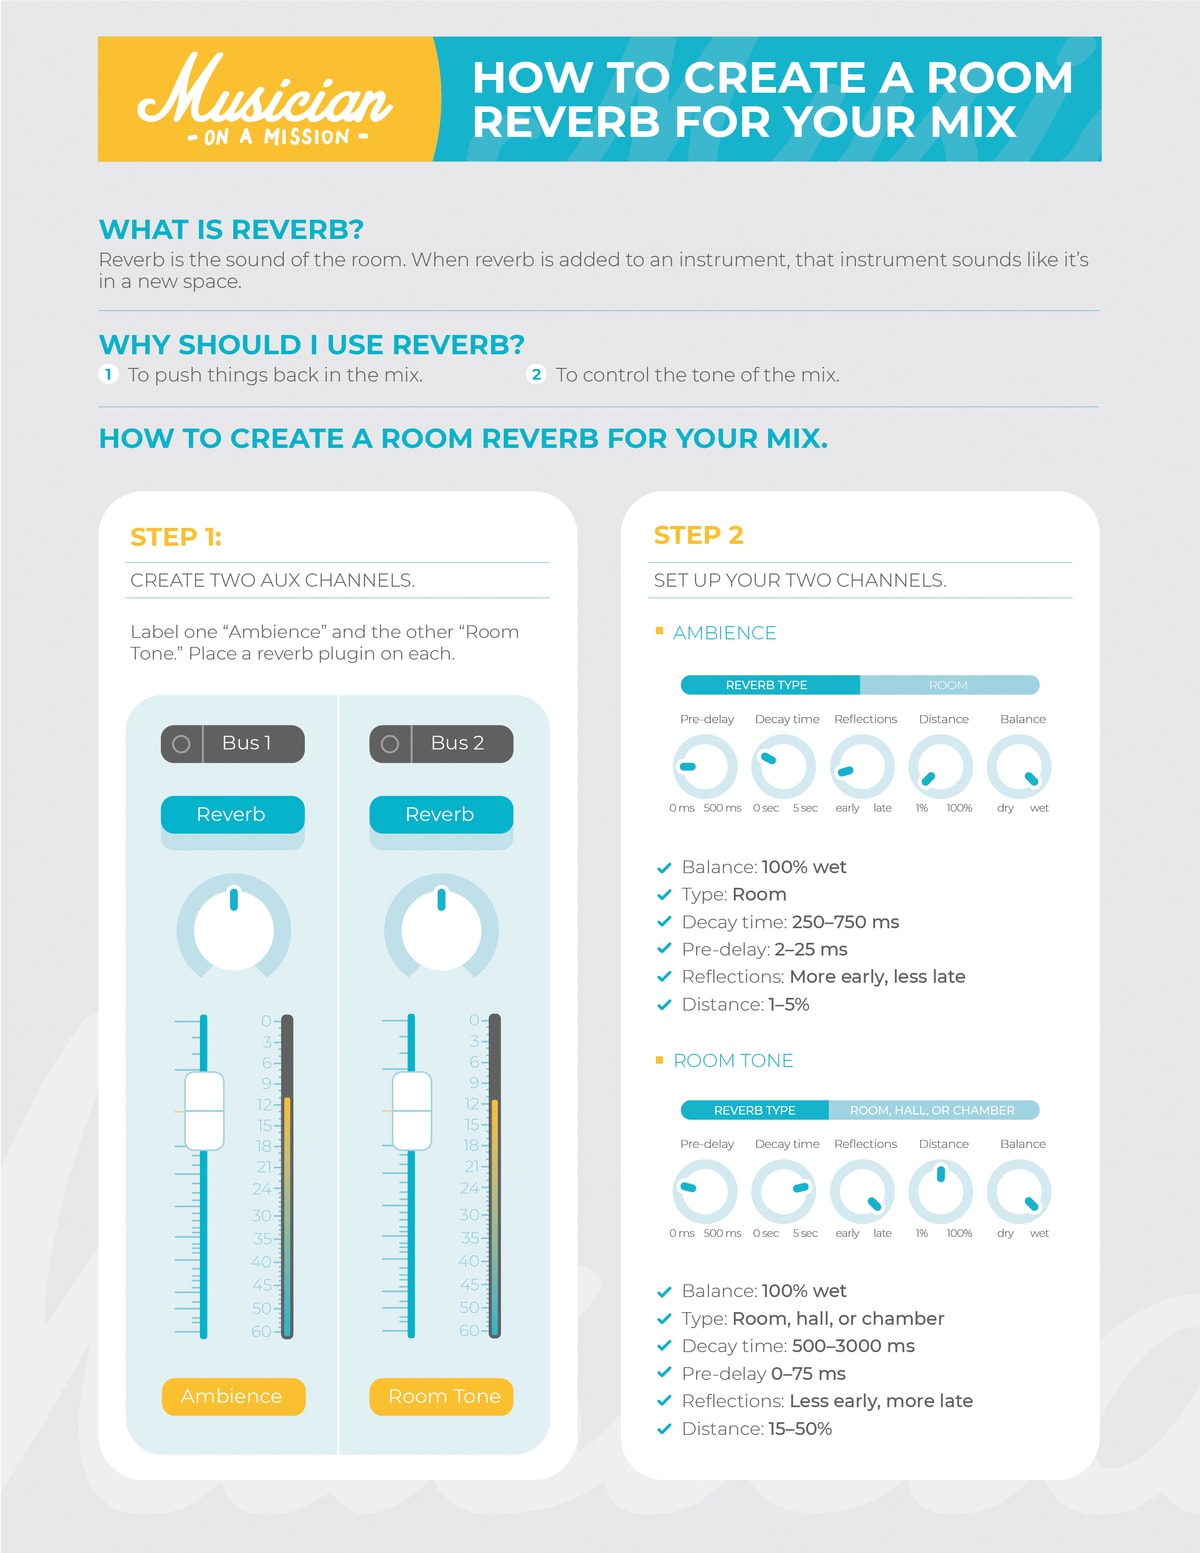
You can create cohesion in a mix by sending everything to the same reverb buss within your DAW. This way, you're putting all of the instruments in the same digital space, as if everything was in the same room.
What a lot of mixers like to do is use several different reverbs – so we might have a shorter plate for the vocal, a room for the drums or guitars, and so on. But now what's happening is that you'll have two separate spaces. This reduces cohesion.
If you want your mixes to sound cohesive, you'll want to put everything in the same space, making it sound like it's in the same room. You do that by sticking to one reverb buss.
Here's how you set one up.
Adding Interest
You can add reverb in different spots, on specific notes, fills, or words.
Sometimes you'll be using reverb creatively to create the vibe of the track, and not just to add depth or cohesion.
A less realistic sounding effect, like spring reverb, is usually great for this.
If you want to refer back to these three core techniques, use this free cheat sheet when you mix:
Mixing with Reverb Is Easy-Peasy with These 8 Quick Tips
The key to making your mixes sound modern and professional is depth. A good mix is more than just a good recording. It has a sense of space, a 'larger-than-life' quality... In essence, a good mix sounds 3D. So, how do you achieve that? It all comes down to your use of reverb and delay. In this ultim
Tip 1: Short Decay Times
Using short decay times is key to not overwhelming making your mixes messy.
You can use a lot of reverb in your mixes – and this comes down to personal preference. But if you use a lot of reverb in tandem with long decay times it will make your mixes sound very messy.
Err on the side of caution and use shorter decay times. Your aim should be for the reverb tail to drop off before the next hit, crochet, or whole note.
Tip 2: Use One Plugin
Have a reverb plugin that is your go-to – learn it, master it, and use it every time you mix. This goes for any type of plugin – one for compression, one for EQ, and so forth.
But this is even more important with reverb because as soon as you start experimenting with different types of reverb and different plugins, it's a real rabbit hole you can fall into – whereas having your go-to room reverb will simplify your process and help you polish your mixes effectively.
Whatever plugin you're using doesn't matter – what matters is that you stick to the same one. This will help you bypass a lot of frustration.
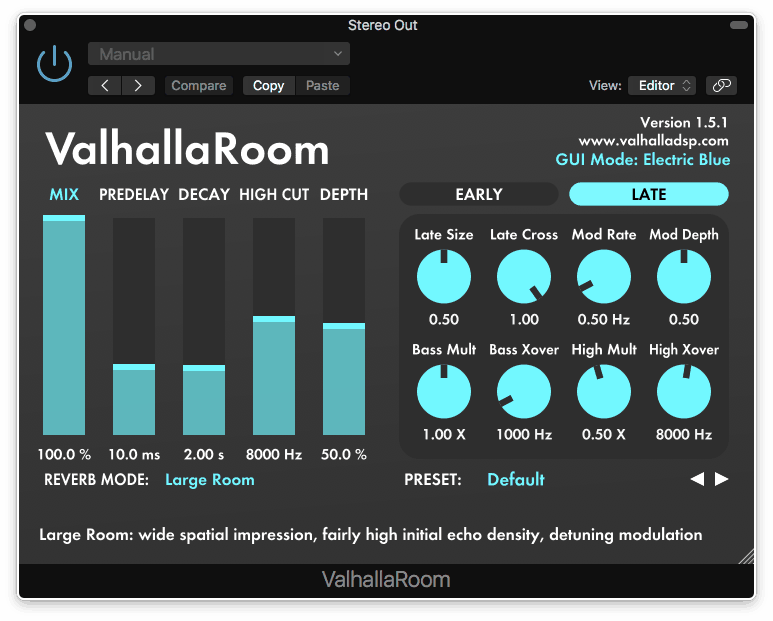
My favorite right now is Valhalla Room.
Tip 3: Use a Buss
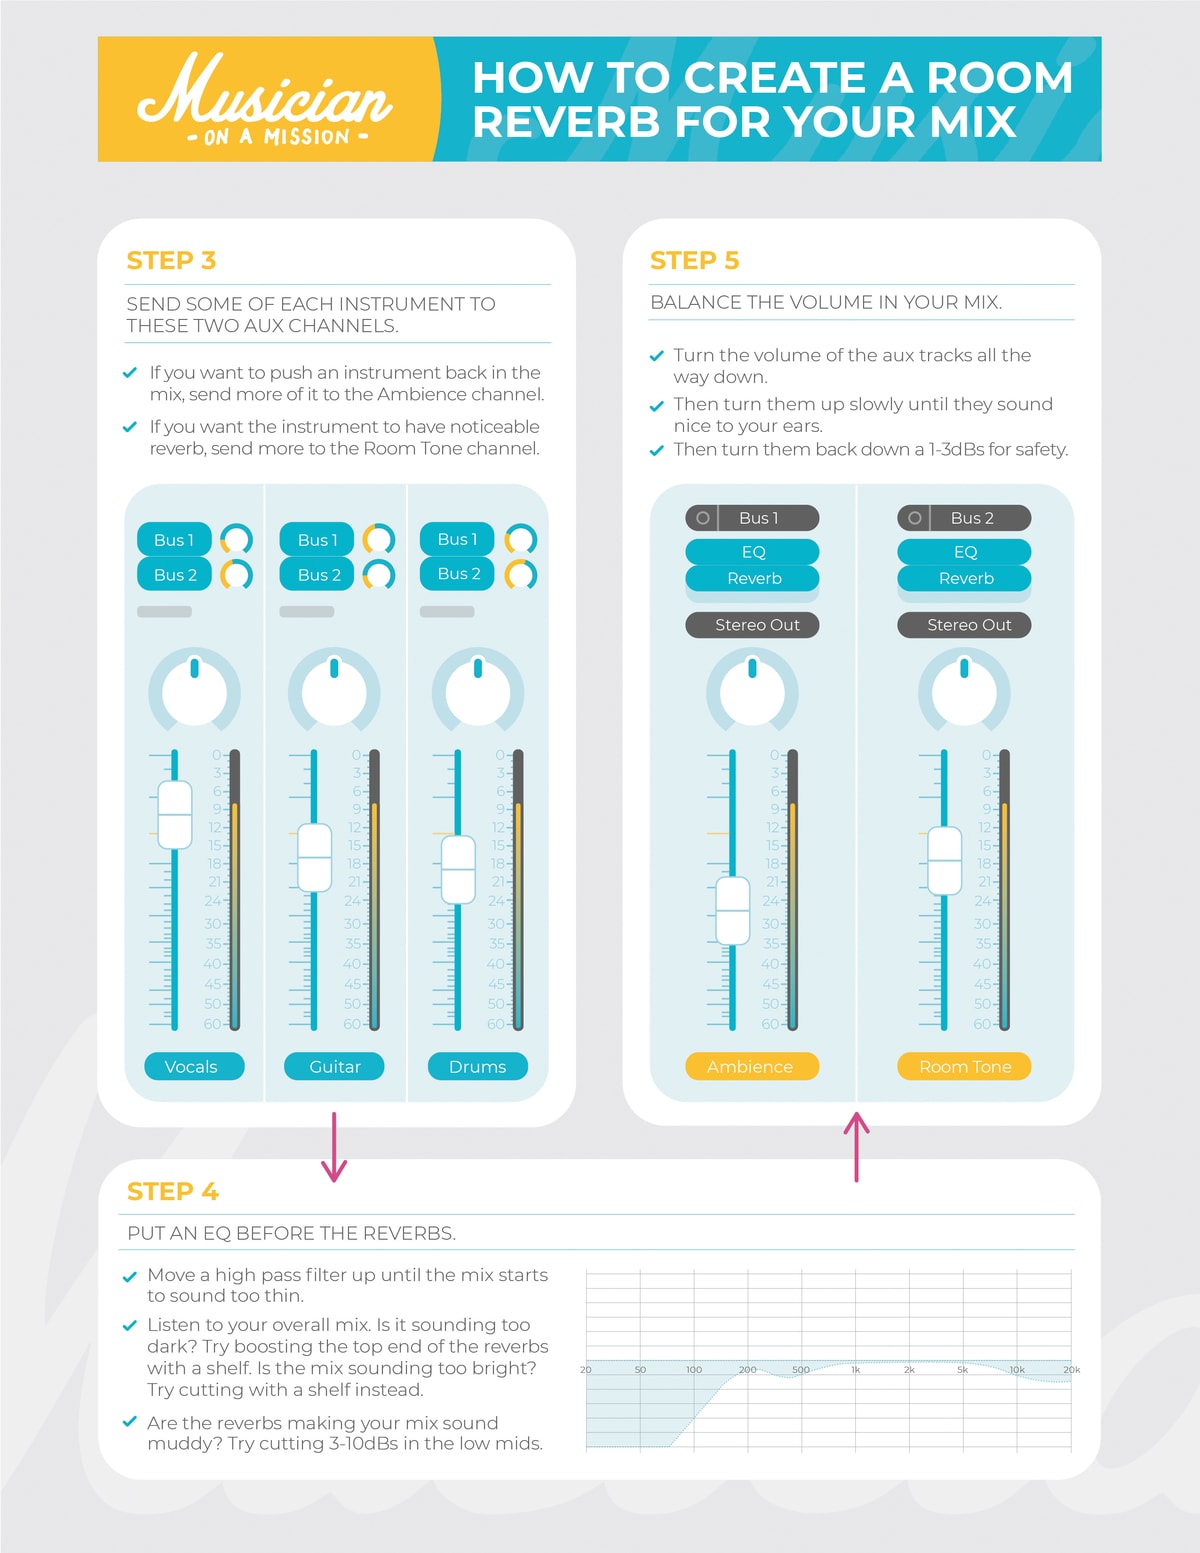
Make sure to always use your room or main reverb on a stereo buss/aux/fx channel.
If you're using a different reverb on every single channel, that's going to use up your CPU very quickly.
Plus, as mentioned earlier, having a single reverb buss (or at most, two or three) helps you to create cohesion in your mixes – because you're sending everything to the same space.
If you want to add reverb to a specific part, all you have to do is use the send and increase the level. If you want to make something sound further away, you can increase the reverb; or, if you want to make something sound closer, you can use less.
By sending each channel with varying amounts of reverb to a single buss, it becomes a lot easier to create depth while maintaining cohesion.
Tip 4: Use Less
Always use less reverb than you think is necessary. Generally, reverb should have a more subconscious psycho-acoustic effect than an obvious audible effect.
Of course, there will be situations where you're using reverb as a creative effect – you want it the effect to be audible. However, if you're just using a general room reverb on your mix to add depth, then the effect should be kept subtle.
Tip 5: Use Delays
Use delay instead of reverb when appropriate. You don't want to rely on reverb all the time to create space in your mixes – use delays as well.
You don't always need to use reverb – you can use delay if you want to put a part further back in the mix. Instead of adding reverb, load up a single delay, use one repetition, and adjust accordingly.
Tip 6: Use Subtle Reverb On Your Delay Sends
Go to your delay send (and this is another reason to use effects on busses) and apply a small amount of reverb on the delay.
What this will do is just sweeten up your delays a tiny bit and help them to sit a bit further back in the mix – and add to the overall cohesion of the mix
Tip 7: Use Pre-Delays
Use pre-delay if you're adding reverb to something that you want to stay up front in the mix.
For example, try using a 60ms pre-delay on a vocal. What that will do is move the reverb back a bit, so that the initial attack of the note or the vocal doesn't have any reverb on it.
The effect starts sixty milliseconds later – which is a very small period of time, but since the attack and the onset won't immediately have reverb, this will help it to cut through the mix a bit more.
On vocals, fifty milliseconds or more tends to work best, and doing that will help to move the reverb slightly out of the way.
You can do the same with guitars or anything else where you want to add reverb to create a sense of space, cohesion or depth – but where you don't necessarily want to put it further away.
Tip 8: Experiment with EQ
Make sure you experiment with EQ on your effects sends.
This is another big reason to use your reverb on the same channel – because now you can just add an EQ after the reverb.
You can cut the bottom end, you can remove some of the mud around the low mids, and you can experiment with boosting or cutting the highs. This can have quite a big impact on how the reverb sits in the mix.
Boosting the highs will make the reverb more obvious. Cutting the highs can make it sound warmer (but it can lead to a muddier sound, and that's something you want to be careful of) and it makes the reverb sound less obvious.
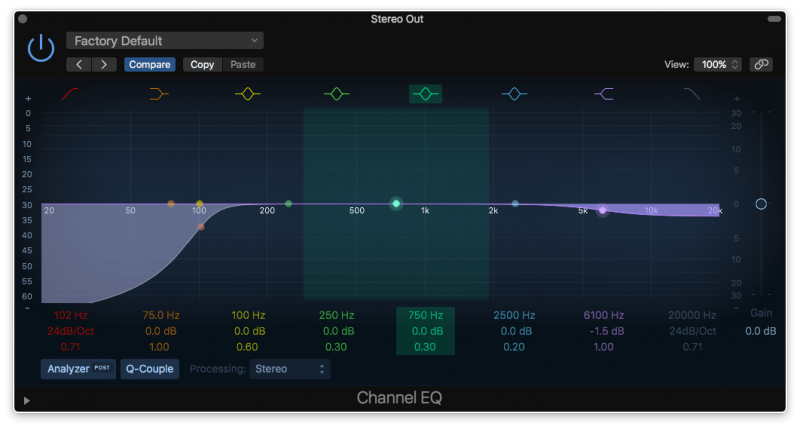
A lot of reverb plugins have EQs built in that you can adjust, like Eventide Stereo Room, but sometimes it's nicer just to load up an EQ. You can clearly see what's going on, and it's much easier to control the sound of the reverb.
UPDATE: Check out these 5 reverb techniques for adding space, depth and size – without muddying up the mix:
The key to making your mixes sound modern and professional is depth. A good mix is more than just a good recording. It has a sense of space, a 'larger-than-life' quality... In essence, a good mix sounds 3D. So, how do you achieve that? It all comes down to your use of reverb and delay. In this ultim
All of these tips are covered in the free cheat sheet, which will serve as a handy reminder during a mix:
Reverb vs Delay – How to Make Your Mixes 3D
The key to making your mixes sound modern and professional is depth. A good mix is more than just a good recording. It has a sense of space, a 'larger-than-life' quality... In essence, a good mix sounds 3D. So, how do you achieve that? It all comes down to your use of reverb and delay. In this ultim
Now let's talk about the difference between reverb and delay, and when you should use each.
We'll also discuss three key approaches you can use to help you use reverb and delay to create depth, interest, and space in your mixes.
Reverb and Delay – The Key Difference
Both of these effects can be used to create depth and space in your mixes, but there's one clear distinction…
Reverb creates space while moving sound further away from the listener; delay creates space while keeping sound near to the listener.
It's vital to understand this distinction because even though both reverb and delay can be used to create space, they sound very different – and they have completely different effects on the listener.
We can break this down into three key strategies.
Strategy One – Using Reverb
Approach one is to use reverb to create space and depth, and to push the sound further away. Decay time should generally be below two seconds, and nearer to one second; long reverb times can very quickly clog up your mix.
If it's a slower track or a track that lends itself to having a more open and reverb-heavy sound, then you can go nearer to two seconds. But if it's a faster, dry, or more aggressive track, then you'll want to stick to the one-second rule.
Strategy Two – Using Delay
Let's say you have something like the lead vocals that we want to add a sense of space too. We don't want them to sound dry and boring, but we also don't want use reverb to drive them away from the listener.
Instead of reverb, we can use delay. It creates a sense of space around the vocal and makes it sound a bit more polished and more realistic without putting it further back in the mix.
This is how you make your vocals sound radio-ready:
The key to making your mixes sound modern and professional is depth. A good mix is more than just a good recording. It has a sense of space, a 'larger-than-life' quality... In essence, a good mix sounds 3D. So, how do you achieve that? It all comes down to your use of reverb and delay. In this ultim
Strategy Three – Mix It Up
The third strategy is to use either reverb or delay to add interest and character.
We can think about these effects in two ways – reverb and delay can be used as either subtle mixing techniques OR as obvious effects.
If you're using these plugins as creative effects, don't hold back. Break the rules.
Sometimes you might want a lot of reverb on the track simply because it sounds good. And you can use mono echo delays on the vocal to add some intrigue. Go wild!
Do you want to make money from your music?
You don't need expensive gear, connections, or god-like knowledge to kickstart your career.
This free Masterclass reveals the key steps you ACTUALLY need to make a reliable income doing what you love in 2021.
Catch the full Masterclass here:
UPDATE: Check out the following video to see a great dual reverb mixing trick:
The key to making your mixes sound modern and professional is depth. A good mix is more than just a good recording. It has a sense of space, a 'larger-than-life' quality... In essence, a good mix sounds 3D. So, how do you achieve that? It all comes down to your use of reverb and delay. In this ultim

Audio professional, musician and founder of Musician on a Mission.
How to Reduce the Reverb on a Track
Source: https://www.musicianonamission.com/how-to-use-reverb/
0 Response to "How to Reduce the Reverb on a Track"
Enregistrer un commentaire